

Best 3D Printers for Gaming Miniatures in 2025
Updated October 2025
Tested by Morgan Blake
Printing 28 mm heroes and tabletop armies is a different challenge than making phone stands. You need sharp XY resolution, reliable layer adhesion, clean supports, and a workflow that keeps details crisp. This 2025 guide explains what matters for minis, compares the top resin and FDM picks, and shows how to dial settings so your parts look good on the table and up close.
Quick Comparison: Best Printers for Minis in 2025
| Model | Type | Why it wins for minis | Best for | Check price |
|---|---|---|---|---|
| Phrozen Sonic Mini 8K S | MSLA Resin | Very high XY resolution for faces, armor filigree, and tiny text | Display minis at 28–54 mm | Amazon |
| Elegoo Mars 4 Ultra | MSLA Resin | Fast prints with great surface quality and stable ecosystem | Army batches and accessories | Amazon |
| Anycubic Photon Mono 4 | MSLA Resin | Entry price with crisp detail for first resin projects | Beginners learning supports | Amazon |
| Bambu Lab P1S | FDM | Speed and accuracy for terrain with clean overhangs | Large terrain and props | Amazon |
| Prusa MK4 | FDM | Trusted reliability and profiles for PLA and PETG | Durable scatter terrain | Amazon |
| Elegoo Saturn 3 | MSLA Resin | Bigger plate for multi-mini batches that stay sharp | Printing whole squads | Amazon |
We selected current 2025 models for minis detail and terrain throughput. If you need sub-$500 options, see our best 3D printers under $500 roundup and the under $300 list.
Buyer’s Guide: What Matters for Miniatures
Miniatures reveal flaws that a phone holder never will. Faces, fingers, weapons, and cape folds expose layer lines and ringing. That is why resin dominates for 28 mm to 54 mm figures. FDM wins for large terrain, buildings, and scatter pieces. If you are getting started, skim our how to use a 3D printer tutorial to set expectations and workflow basics.
Resolution, XY accuracy, and layer height
For minis, XY resolution and anti-aliasing on resin printers define crisp edges and eyes. Layer height still matters, but do not chase ultra-low layers if your XY cannot support it. For FDM, layer height and nozzle diameter control visible stepping. Our calibration guide explains flow rate, e-steps, and PID so details pop without blobs.
Materials and safety
PLA and PETG are perfect for terrain, while photopolymer resin is the standard for minis. Resin requires PPE and ventilation, plus proper disposal after washing and curing. See our resin 3D printing safety checklist before your first pour.
Supports and post-processing
Orientation, light supports, and drain holes prevent soft detail and elephant skin. After printing, wash in fresh IPA, cure until dry to the touch, then sand and prime. Avoid over-curing that makes parts brittle.
New to filaments and terrain durability choices, like PETG vs PLA vs TPU bumpers for scatter terrain, read our filament buyer’s guide.
Top Resin Printers for 28–54 mm Minis
1) Phrozen Sonic Mini 8K S
For tabletop miniatures where faces, filigree, and tiny text must read cleanly at arm’s length, the Phrozen Sonic Mini 8K S is the safest high-detail bet for most hobbyists. Its extremely fine XY resolution, combined with mature resin profiles and predictable anti-aliasing, makes it easier to produce sharp eyes, crisp lips, and armor trim without that waxy look some machines create. You’ll still need to dial supports — light tips and smart placement off highly visible areas — but the Mini 8K S keeps failures low once exposure is tuned. Compared with older 2019-era machines, you’ll see smoother surfaces that take primer evenly and need less sanding. The plate isn’t massive, which is fine for single heroes and small squads; batch armies are better on a larger machine below. If you’re just moving from FDM to resin for characters, consider reading our resin safety checklist and quick-start notes in the 3D Printing Hub first so your space, PPE, and curing flow are squared away.

Ultra-sharp XY resolution that renders facial features and armor trim without mushy edges. Great “first serious” minis machine.
Pros
- Outstanding micro-detail for 28–54 mm figures
- Stable ecosystem and profiles
- Predictable anti-aliasing; less waxy look
Cons
- Small-ish plate for batch armies
- Resin + IPA workflow adds cost
2) Elegoo Mars 4 Ultra
Elegoo’s Mars 4 Ultra hits a sweet spot of speed, surface finish, and price, making it ideal for printing heads, weapons, and proxies in reliable batches. Where older entry machines struggled with soft edges and banding, this unit produces smoother armor planes and sharper panel lines at practical layer heights. It’s fast enough that cranking out a handful of character sculpts for a new campaign night doesn’t feel like an all-day chore. Exposure tuning is straightforward, and there’s abundant community guidance for supports on typical fantasy and sci-fi poses — think cloaks, raised weapons, and dynamic lunges. The modest Z height means towering diorama pieces still belong on a larger plate, but for the “do a lot, do it well” role in a minis workshop, Mars 4 Ultra is easy to live with. If you’re just getting processes down, pair it with our calibration guide so your first week of prints sets a high bar.

Balanced speed and surface quality with a big user community — perfect for squads, proxies, and accessories.
Pros
- Predictable results with practical settings
- Great value and ecosystem
- Strong community support
Cons
- Limited Z height for tall dioramas
3) Anycubic Photon Mono 4
If you’re resin-curious but budget-guarded, the Anycubic Photon Mono 4 is the friendliest on-ramp we recommend. It delivers crisp detail far beyond the original 2019 Photon, with easier setup, clearer interfaces, and ample third-party exposure charts to jumpstart success. Expect to tune exposure and supports a bit more than on premium 8K rigs, but you’ll still get sharp helmets, blades, and belts at sensible layer heights. The compact plate is perfect for learning: fewer parts per run means fewer variables and faster feedback loops as you master washing, curing, and post-processing. Once you’ve printed a few heroes and sidekicks, you’ll have the flow to scale up to larger plates if you want batch production. Before the first pour, skim our common 3D printing mistakes to avoid the most common failure points.

Beginner-friendly price and setup with detail that punches above its weight for character prints.
Pros
- Affordable resin entry point
- Clean, sharp results at practical layers
- Tons of setup guidance available
Cons
- Smaller plate; lighter micro-detail vs 8K rigs
4) Elegoo Saturn 3
When you’re ready to print whole squads with consistent quality, the Elegoo Saturn 3’s larger plate and stable optics make throughput painless. You sacrifice a hair of bleeding-edge micro-detail relative to the tiniest-pixel 8K minis machines, but you gain the ability to stage multiple torsos, heads, and bases in a single job and have them all cure evenly. That’s a huge win for painters who like to batch and for creators selling small runs. Plan on larger wash/cure gear and more resin on hand; the machine’s efficiency shines when you keep it busy. For makers optimizing production passes, orient to minimize suction, keep supports light but plentiful, and rotate models so contact points fall under cloaks and behind pauldrons. Tie your process together with the calibration steps in our calibration guide for fewer surprises across batches.

Bigger, consistent build area for squads and bases without losing the crispness minis need.
Pros
- High throughput for batch minis
- Predictable surface quality
- Strong parts ecosystem
Cons
- Needs larger wash/cure gear
- Higher resin consumption
Top FDM Printers for Terrain, Buildings, and Props
Use FDM for anything big: buildings, ruins, hills, and scatter. Terrain hides layer lines with texture and paint, and speed matters more than ultra-low layers. If you’re chasing smooth arches and clean masonry, revisit nozzle diameter and layer height in our calibration guide and compare PLA vs PETG choices in our filament buyer’s guide.
1) Bambu Lab P1S
Bambu Lab’s P1S is the terrain workhorse we recommend for fast, clean results with minimal fuss. Core-XY motion and strong part cooling keep overhangs crisp, cobblestone textures distinct, and bridges tidy without endless tuning. Automatic flow calibration and solid first-layer routines make massive plates of ruins or walls far less nerve-wracking. You can run a 0.4 mm nozzle at 0.2–0.28 mm layers for a great blend of speed and texture, or swap to 0.6 mm when throughput matters most. The ecosystem leans proprietary, but for makers who value “push print, get terrain,” it’s a non-issue. For scatter pieces that take a beating, PETG ups toughness, while PLA remains a paint-friendly default. If you prime right after printing, ringing and surface artifacts almost disappear under texture paints and dry-brushing.

High-speed, low-drama terrain printing with clean overhangs and strong first-layer consistency.
Pros
- Fast core-XY with excellent cooling
- Automatic flow and reliable first layers
- Great for 0.6 mm “speed terrain”
Cons
- More proprietary than tinkerer-focused printers
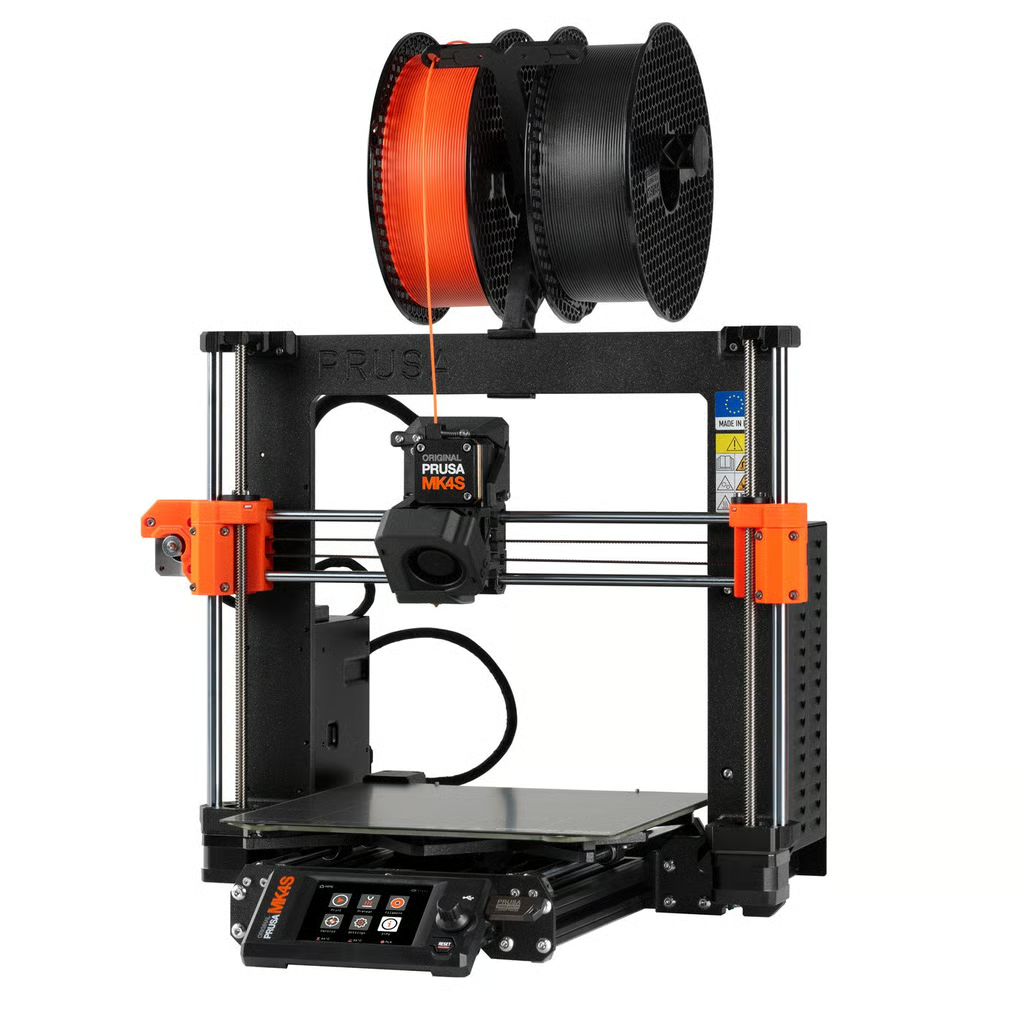
2) Prusa MK4
When reliability is non-negotiable, the Prusa MK4’s print quality, firmware polish, and support network keep long terrain jobs finishing cleanly. It’s not the absolute fastest, but it is incredibly consistent day after day, which matters when you’re queuing multi-hour walls, buildings, and bridges. The textured build plates are forgiving on first layers, and the default profiles for PLA and PETG cover most terrain use cases without tinkering. Parts come off with a nice tooth for primer, and stringing is easy to tame with sensible temperatures and retraction presets. If you’re teaching someone else to print terrain, this is the “just works” option. For smoother arches, try tree supports and a 0.4 mm nozzle at 0.2 mm layers; for throughput, bump to 0.6 mm and 0.28 mm layers — and remember paint and texture paste hide a multitude of sins.
Rock-solid, predictable results for big terrain jobs; huge knowledge base and profiles.
Pros
- Highly consistent output
- Great documentation and community
- Plenty of upgrade paths
Cons
- Not the outright fastest option
Miniature Settings and Workflow That Work
Resin basics for crisp minis
- Layer height: 0.03–0.05 mm for faces and tiny details
- Anti-aliasing: Moderate settings prevent waxy edges
- Supports: Light to medium with pointed tips under chins and elbows
- Wash: Two fresh IPA baths, 30–60 seconds each, gentle agitation
- Cure: Short cycles to avoid brittleness, rotate for even exposure
For deeper setup help, see our calibration guide and common 3D printing mistakes to avoid. New users can also jump to the 3D Printing FAQ hub and our main 3D Printing Hub 2025 for materials and tools.
FDM basics for durable terrain
- Nozzle: 0.4 mm for detail, 0.6 mm for faster walls and rocks
- Layer height: 0.2–0.28 mm for faster throughput with good texture
- Material: PETG for toughness, PLA for easy printing, TPU for bumpers
- Supports: Tree or organic supports reduce scarring on arches
If you want affordable hardware to learn on, our updated under $500 and under $300 lists are the next step.
About Older Models
You may see references around the web to early machines like the original Anycubic Photon, Wanhao D7, and FlashForge Creator Pro. Those helped the hobby grow, but modern 2025 printers deliver cleaner detail, faster throughput, and better software. This guide uses current picks so beginners do not start with outdated gear.
FAQ
Is resin always better than FDM for minis
For 28–54 mm figures, resin wins on surface finish and micro detail. FDM can work for larger figures or when you plan to sand and fill. Many makers use resin for characters and FDM for terrain and vehicles.
What layer height should I use for faces
On resin, 0.03–0.05 mm is a sweet spot. Going lower increases time without clear gains unless your XY resolution can support it. On FDM, try 0.12–0.16 mm with a 0.4 mm nozzle for large minis.
How do I keep supports from scarring detail
Use light supports with small contact tips, angle the model to move contacts off faces, and sand gently after curing. Many slicers offer support blockers for fragile areas.
What safety steps do I need for resin
Wear nitrile gloves and eye protection, ventilate your space, keep separate IPA baths, and fully cure parts and paper towels before disposal. Read our resin safety checklist.
Can I print an entire army at once
Yes with larger plates like Saturn 3, but success depends on support consistency and resin temperature. Printing in smaller batches improves yield for new users.


